Vietnamese cuisine: Cá giã muối ớt, the recipe

Cucina vietnamita: Cá giã muối ớt, la ricetta

Vietnamese Cuisine: Cá giã muối ớt, the recipe.
Fish pounded with salt and chili pepper. A nice fish (a sea bream, steamed) pounded with salt and chili pepper is a familiar dish for ethnic minorities in the central highlands of Vietnam. The fish is rich in flavor from the chili pepper, fragrant with spices and very delicious for rice. People from some small villages often prepare this dish and take it to the fields or prepare it to be eaten on rainy days because it is very delicious and easy to prepare.
In this case I prepared this dish but with a slight variation, using a fresh fish and steaming it; then I mince it together with the spices purchased in Italy.
Let's go to the kitchen!

Click vào đây để đọc bằng tiếng việt!
If you are curious about this recipe of mine or Vietnamese food in general, write me a message. comment or go to the bottom of the site to read what other visitors have written.

Ingredients

•⁠ ⁠Sea bream: 1 fish (half a kilo);
•⁠ ⁠Thai basil: eat as much as you want;
•⁠ ⁠2 purple onions, 6 cloves of garlic: peel and chop finely;
•⁠ Fish sauce;
•⁠ ⁠6 chillies (to make it less spicy), 2 cloves of lemongrass: finely chopped;
•⁠ ⁠Spices: salt, sugar, seasoning powder, monosodium glutamate, pepper, chilli powder.

Preparation

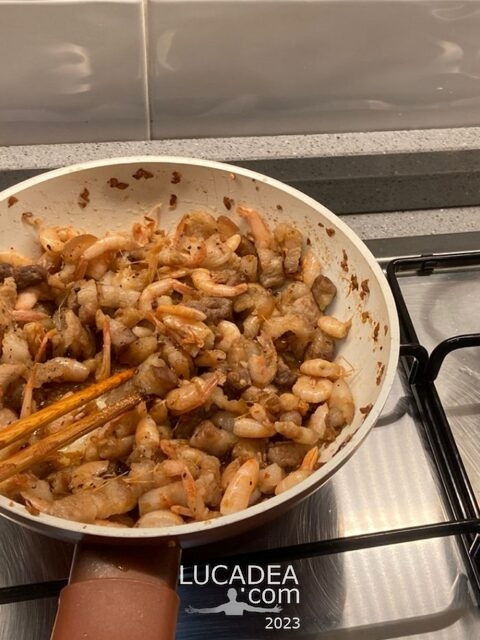
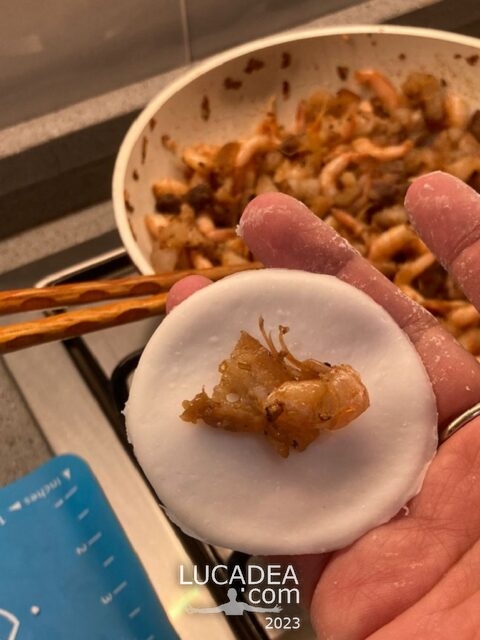
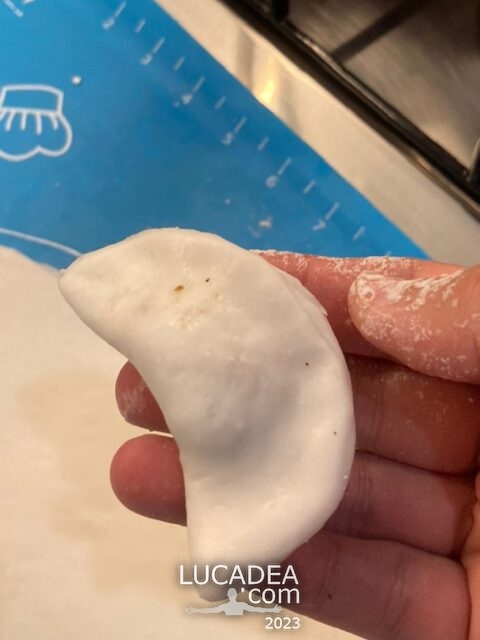
Clean the fish, marinate it with 1 tablespoon of fish sauce, then steam it until cooked, then put it on a plate and remove the bones, leaving only the meat.
Then put everything in a mortar (I use the marble one that my husband says they would use for Genoese pesto at home): onion, garlic, lemongrass, chili pepper, basil leaves and crush until it is almost pureed. Add the fish and spices: 1 tablespoon of powdered seasoning, 1/2 teaspoon of salt, 1/2 teaspoon of salt 2 teaspoons of monosodium glutamate / 2 teaspoon of sugar, 1 teaspoon of pepper, 1 teaspoon of chili powder. Mash the whole mixture until it becomes frothy or crush it a little (your choice), then put it in a pan, to dry it.
The spices listed above are for reference only. During processing, depending on the quantity and type of onions and garlic you add, you can season to your taste.
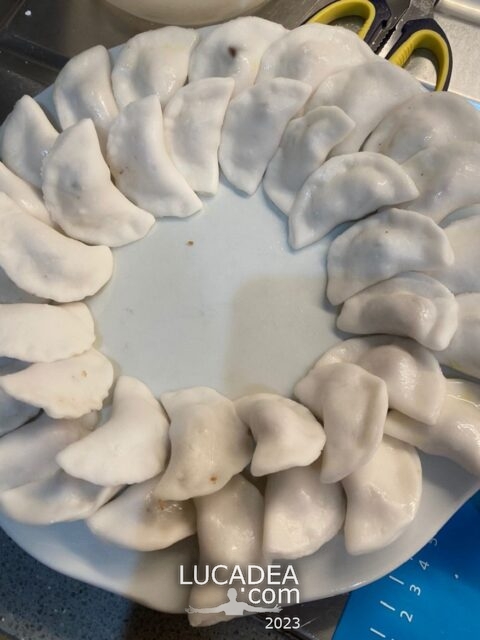
The drier the fish, the longer it can be stored in the refrigerator.
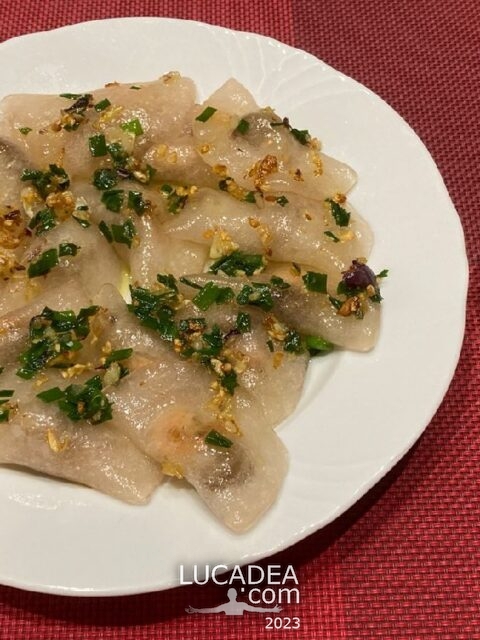
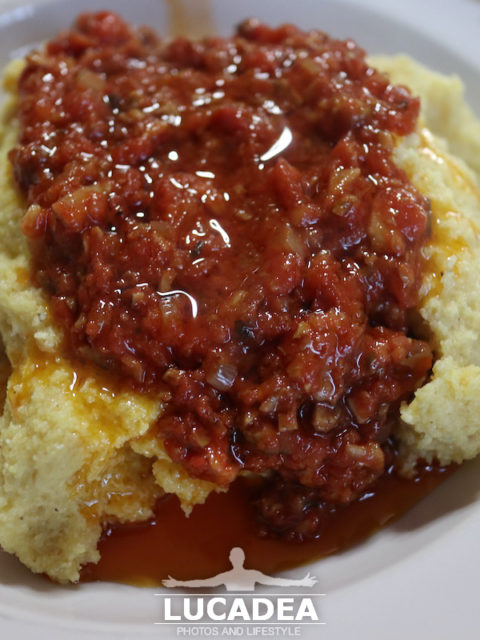
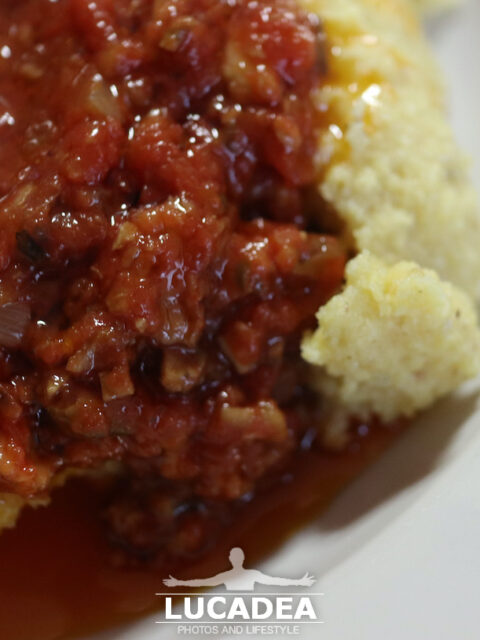
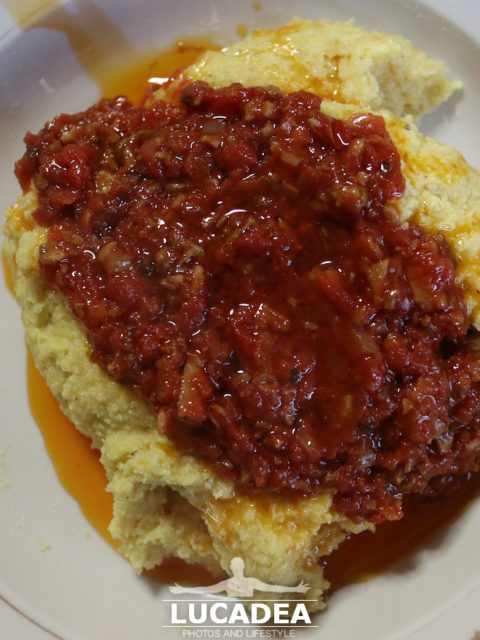
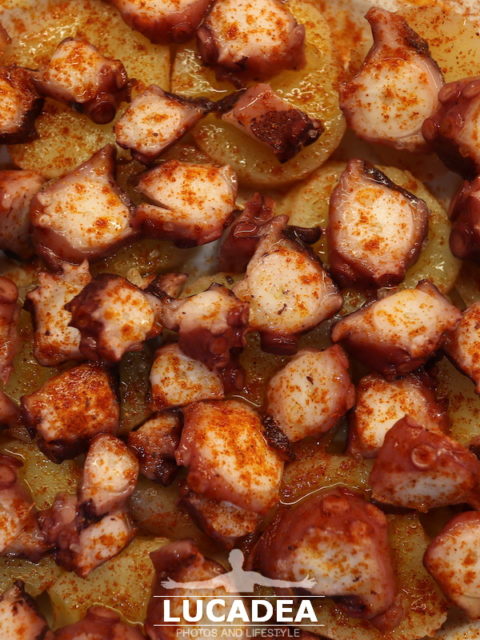
The fish pounded with salt and chili pepper has a rich flavor, fragrant with basil and spices, mixed with the spicy taste of chili pepper, and is extremely delicious when eaten with hot rice.

Cá (khô/ hấp) giã muối ớt là một món ăn quen thuộc đối với đồng bào dân tộc vùng Tây Nguyên Việt Nam, cá đậm đà quyện vị tê cay từ ớt, thơm mùi các loại rau gia vị, rất ngon cơm. Đồng bào dân tộc thường làm món này mang lên rẫy hoặc dự trữ ăn vào những ngày mưa gió vì rất ngon và tiện lợi.
Nay tôi làm theo món này nhưng có biến tấu một chút, tôi sử dụng cá tươi và hấp, giã cùng các loại gia vị mua được bên Ý và sấy không quá khô.
Nào chúng ta cùng vào bếp nhé!

Nguyên liệu

•⁠ ⁠Cá tráp (orata): 1 con (nửa ký)
•⁠ ⁠Rau húng quế (Thai basil): ăn bao nhiêu, cho bấy nhiêu
•⁠ ⁠2 củ hành tím, 6 tép tỏi: bóc bỏ vỏ và thái nhỏ
•⁠ ⁠6 trái ớt (ăn ít cay cho ít lại), 2 tép sả: thái nhỏ
•⁠ ⁠Gia vị: muối, đường, hạt nêm, bột ngọt, tiêu, ớt bột.

Cách làm 

Cá làm sạch, ướp 1 muỗng canh nước mắm rồi cho lên hấp đến khi cá chín thì cho ra dĩa và róc bỏ xương, chỉ lấy thịt cá.
Sau đó cho toàn bộ: hành, tỏi, sả, ớt, lá húng quế vào cối và giã đến khi gần nhuyễn cho thêm cá và các loại gia vị: 1 muỗng canh hạt nêm, 1/2 muỗng cà phê muối, 1/2 muỗng cà phê bột ngọt, 1/2 muỗng cà phê đường, 1 muỗng cà phê tiêu, 1 muỗng cà phê ớt bột. Giã toàn bộ hỗn hợp đến khi tơi bông hoặc giã một ít (tuỳ bạn), sau đó cho lên chảo, sấy khô và nêm lại gia vị vừa ăn. (Gia vị trên mang tính tham khảo, trong lúc chế biến, tuỳ vào lượng ra và các loại hành tỏi bạn cho vào, bạn nêm lại cho vừa khẩu vị).

Cá được sấy càng khô, càng bảo quản được lâu trong tủ lạnh.

Cá giã muối ớt vị đậm đà thơm mùi rau húng quế và các loại gia vị, hoà quyện vị tê cay từ ớt, ăn cùng với cơm nóng cực kì ngon.

Vietnamese cuisine: Cá giã muối ớt, the recipe – Cuisine vietnamienne : Cá giã muối ớt, la recette – Cocina vietnamita: Cá giã muối ớt, la receta – Cozinha vietnamita: Cá giã muối ớt, a receita – Vietnamesische Küche: Cá giã muối ớt, das Rezept – Vietnamesische Küche: Cá giã muối ớt, das Rezept

Homemade Greek Gyros by Me, the Recipe

Il gyros greco fatto in casa da me, la ricetta

Homemade Greek gyros, the recipe.
One of the dishes that I have started to like a lot in recent years is Greek gyros (the pork one). Since Greek restaurants are not so common in my area (even though there has been one in Chiavari for a long time) I decided to try making it at home. The result, still a little far from the classic, was not bad anyway.
I'll tell you right away: don't criticize me too much but suggest how to improve the dish.

Ingredients

For the meat:
– 500 grams of pork (for example, pork loin or shoulder);
– 2 teaspoons of dried oregano (for the spices I opted to buy a ready-made package on Amazon);
– 2 teaspoons of sweet paprika;
– 2 teaspoons of ground cumin;
– 3 cloves of garlic, minced;
– Juice of 1 lemon;
– Salt and black pepper to taste;
– 2 tablespoons of olive oil.

As a side dish:
– 4 Greek pitas or round rolls (I bought tigelle);
– Tzatziki sauce (see recipe below);
– Thinly sliced ​​red onions.

For the tzatziki sauce:
– 1 cucumber, peeled, seeded and grated;
– 250 grams Greek yogurt;
– 2 cloves garlic, finely chopped;
– 2 tablespoons olive oil;
– 1 tablespoon white wine vinegar;
– 1 tablespoon chopped fresh mint;
– Salt and black pepper to taste;

Preparation

Start by making the marinade for the meat. In a bowl, mix together the oregano, paprika, cumin, minced garlic, lemon juice, salt, pepper and olive oil. Add the pork cut into thin strips and make sure it is well coated with the marinade. Cover the bowl and let it marinate in the refrigerator for at least 30 minutes, but preferably for several hours or overnight.
In the meantime, make the tzatziki sauce. Grate the cucumber and squeeze out the excess water. In a bowl, mix together the grated cucumber, Greek yogurt, minced garlic, olive oil, white wine vinegar, mint, salt and pepper. Refrigerate the tzatziki sauce until ready to serve.
Preheat a grill or nonstick skillet over medium-high heat. Cook the marinated pork strips until they are cooked through and have developed a nice golden color, about 4-5 minutes per side.
Heat the Greek pitas or round sandwiches in a skillet or on the grill until they are lightly browned.

To serve, place the grilled pork, bread and a few strips of red onion on a plate. On the side, the tzatziki sauce.
Complete if you want (but I didn't put them because I don't like them) with tomato slices, lettuce leaves and, if you want, green peppers or jalapeños.

This is your delicious Greek pork gyros! Enjoy!
Add your own comment or go to the bottom of the site to read what other visitors have written.

Photo taken with Honor 20.

Homemade Greek gyros, the recipe – Gyros grecs maison, la recette – Gyros griegos caseros, la receta – Giroscópios gregos caseiros, a receita – Hausgemachtes griechisches Gyros, das Rezept – Con quay Hy Lạp tự làm, công thức – 自制希腊陀螺仪,食谱 – 自家製ギリシャのジャイロ、レシピ

The text of the post was written with the help of ChatGPT, a language model from OpenAI.

Vietnamese cuisine: Bánh bột lọc, the recipe

Tortelli di gamberi e pancetta

Vietnamese cuisine: Bánh bột lọc, prawn and bacon dumplings, the recipe.
Some time ago I bought a packet of tapioca flour and finally decided to prepare this dish that I like very much: bánh bột lọc. They are dumplings (or ravioli or dumplings) filled with prawns and bacon.

Click vào đây để đọc bằng tiếng việt!
If you are curious about this recipe of mine or Vietnamese food in general, write me a message. comment or go to the bottom of the site to read what other visitors have written.

Ingredients

* Tapioca flour: 400 grams (easily found in Asian supermarkets);
* Water: 400 ml;
* Bacon: 250 grams, chopped into small pieces;
* Shrimp: 250 grams, finely chopped;
* Red onion and garlic, chopped;
* One shallot, finely chopped;
* Chili pepper, finely chopped;
* Seasoning: salt, sugar, monosodium glutamate, olive oil, cashew oil (coloring)

Preparation

To prepare the filling:
Heat a drizzle of cashew oil in a pan, then add a little chopped onion and garlic, fry until fragrant, then add the bacon and brown it. Then pour in the shrimp and sauté them together, season with spices: a little salt, monosodium glutamate, sugar, pepper, wait for the shrimp to cook, then turn off the stove.

To prepare the tortelli:
Boil the water with a little oil. Then slowly pour the water into the dough, mix well and then knead by hand until you get a smooth dough.
Sprinkle a little dry flour on a flat surface, place the dough on top, knead once more. Then roll out the dough thinly, to a height of 3/4 millimeters and, with the help of a small glass, create some disks of dough. Place a little of the shrimp pulp filling in the center of the disks and fold the disk so that the dough encloses the filling inside. Use two fingers to pinch the edges of the dough together to obtain a half moon. Continue like this until you run out of ingredients.

To save time I make a lot of tortelli and then put them in the freezer to preserve them.
When I want to eat them, I just have to throw them (still frozen) into boiling water.

Prepare the sauce to dress the tortelli:
Add 2 tablespoons of fish sauce with 1 tablespoon of water, add 1/2 teaspoon of sugar, 1 little bit of monosodium glutamate and mix well, then add the finely chopped chili pepper. Separately, in a pan with a little olive oil, brown the shallot and chopped garlic until fragrant and then add the mixture of water and fish sauce.

At this point you just need to cook the tortelli. Throw the tortelli into plenty of boiling water. When you see that the cake dough becomes clear, and you can see the filling inside, remove them from the water and add a little olive oil so that they do not stick to each other as they cool.
Arrange the tortelli on a plate and season generously with the sauce we prepared previously.

And here are the step-by-step photos of this dish:

Cách làm “bánh bột lọc”
Nguyên liệu

* Bột năng: 400 gram (gói bột tapioca starch, mua tại siêu thị người Châu Á)
* Nước: 400ml
* Thịt ba chỉ: 250 gram, thái miếng nhỏ.
* Tôm đất: 250 gram, thái nhỏ như thịt.
* Hành tím và tỏi băm nhuyễn
* 1 chén hành lá, thái nhỏ
* Ớt thái nhỏ
* Gia vị: muối, hạt nêm, đường, bột ngọt, dầu ăn, dầu điều (tạo màu)

Các bước:
Chuẩn bị nước mắm, dầu phết lên bánh:
Nước mắm: Cho 2 muỗng canh nước mắm cùng với 1 muỗng canh nước sôi để nguội, thêm 1/2 muỗng cà phê đường, 1 chút bột ngọt, khuấy đều, sau đó cho ớt thái nhỏ vào.Bạn có thể nêm nếm nước chấm sao cho phù hợp với khẩu vị của mình.
Dầu phết lên bánh:
Cho dầu ăn vào chảo và xào một ít hành tím và tỏi băm nhuyễn cho thơm, sau đó cho hỗn hợp dầu này vào chén hành lá đã thái nhỏ.
Làm nhân bánh
Đun nóng một chút dầu điều trong chảo rồi cho vào ít hành tỏi băm, xào thơm sau đó cho thịt vào xào săn lại. Sau đó, trút tôm vào xào cùng, nêm nếm gia vị: một chút hạt nêm, chút muối, bột ngọt, đường, tiêu, đợi tôm chín thì tắt bếp.
Làm vỏ bánh
Đun sôi nước cùng một chút dầu ăn. Tiếp theo, từ từ đổ nước vào bột, khuấy đều rồi nhào bằng tay để thu được một khố bột dẻo mịn.
Rắc một ít bột khô lên mặt phẳng, đặt khối bột lên, nhào thêm một lần nữa. Sau đó, cán bột mỏng ra, lấy khuôn tròn ịn lên để được phần vỏ bánh.
Gói bánh
Cho nhân tôm thịt vào chính giữa bánh, gấp đôi bột lại sao cho bột gói gọn nhân bên trong.
Dùng hai ngón tay ép chặt mép bột với nhau để có được chiếc BÁNH BỘT LỌC hình bán nguyện. Tiếp tục làm như vậy đến khi hết phần nguyên liệu đã chuẩn bị.
Luộc bánh
Cho nước vào, nấu đến sôi thì cho bánh vào luộc. Khi thấy bột bánh trong lại, có thể nhìn thấy phần nhân bên trong thì tắt bếp, vớt bánh ra để ráo, cho thêm tí dầu ăn (đã chuẩn bị ở trên) cho bánh không bị dính vào nhau
Thưởng thức

Xếp bánh ra đĩa, phết dầu hành lên mặt bánh rồi thưởng thức cùng với nước mắm.

Để tiết kiệm thời gian, bạn làm nhiều bánh rồi cho vào ngăn đá tủ lạnh để bảo quản. Khi muốn ăn bạn chỉ cần đặt bánh xuống ngăn mát rã đông, sau đó luộc chín là được.

Vietnamese cuisine: Bánh bột lọc, prawn and bacon tortelli, the recipe – Cuisine vietnamienne : Bánh bột lọc, tortelli crevettes et bacon, la recette – Cocina vietnamita: Bánh bột lọc, tortelli de gambas y tocino, la receta – Cozinha vietnamita: Bánh bột lọc, tortelli de camarão e bacon, a receita – Vietnamesische Küche: Bánh bột lọc, Garnelen-Speck-Tortelli, das Rezept – Ẩm thực Việt Nam: Bánh bột lọc, tôm và bánh tortelli thịt xông khói, công thức – 越南菜:Bánh bột lọc、虾和培根饺子,食谱 – ベトナム料理:Bánh bột lọc、エビとベーコンのトルテッリ、レシピ

Un bel piatto di roast-beef con patate

Un bel piatto di roast-beef con patate

Un bel piatto di roast-beef con patate.
Da non molto tempo, a casa mia, si prepara il roast-beef una volta al mese.
A me piace veramente tantissimo e la cuoca di famiglia (mia mamma) è arrivata ad un livello altissimo nel preparare questo piatto, come potrete vedere anche voi dalle foto.

Se hai domande oppure se vuoi farmi sapere la tua opinione su questo piatto lascia un commento cliccando here.

Photo taken with Canon EOS M100 and lens Canon EF-M 22.

A nice plate of roast beef with potatoes – Une belle assiette de rosbif aux pommes de terre – Un buen plato de carne asada con patatas – Um belo prato de rosbife com batatas – Ein schöner Teller Roastbeef mit Kartoffeln – Một đĩa thịt bò nướng khoai tây đẹp mắt – 一盘美味的烤牛肉配土豆 – ローストビーフとポテトの素敵なプレート

Pollo al forno, la ricetta

Pollo al forno, la ricetta

Pollo al forno, la ricetta.

Ingredients:

– un pollo fresco (circa 1 kg)
– patate
– olio evo
– sale
– rosmarino
– salvia
– a discrezione dei gusti: aglio, timo, pepe, limone,

A dire la verità non c’è una vera e propria ricetta per cucinare il pollo al forno o almeno come si fa in casa mia è proprio semplice da realizzare.
Per prima cosa abbiamo bisogno di un bel pollo intero e (se volete il contorno) di qualche bella patata tagliata a pezzettini.
Mettiamo il pollo in una teglia di acciaio oppure (questo è stato un improvement recente in casa mia) una pirofila resistente al calore in porcellana.
Spennelliamo bene con olio evo e aggiungiamo sale, rosmarino e qualche foglia di salvia.
Mettiamo tutto in forno ventilato (preriscaldato) a 180° e lasciamo cuocere per un’oretta.
Ovviamente il tempo di cottura varierà a seconda della grandezza del pollo stesso.
Ogni tanto dare un’occhiata e, se riuscite, tappate con il sughetto che si forma durante la cottura.

Se volete un po’ di sprint alla croccantezza della pelle aggiungete il grill negli ultimi 5 minuti di cottura.

Se hai domande oppure se vuoi farmi sapere la tua opinione su questa ricetta lascia un commento cliccando here.

Questo poi è il risultato finale:

Pollo al forno, la ricetta

Pollo al forno, la ricetta

Pollo al forno, la ricetta

Photo taken with Canon EOS M100 and lens Canon EF-M 22.

Baked chicken in Italy, my recipe – Poulet au four en Italie, ma recette – Pollo al horno en Italia, mi receta – Frango assado na Itália, minha receita – Gebackenes Hähnchen in Italien, mein Rezept – Gà nướng ở Ý, công thức của tôi – 意大利烤鸡,我的食谱イタリアの焼き鶏、私のレシピ –

Una buona polenta al sugo di funghi

Polenta al sugo di funghi

Una buona polenta al sugo di funghi.
Non è un piatto proprio tipico di casa mia eppure ogni tanto lo facciamo.
Ovviamente meglio d’inverno.

A te piace la polenta e condita come? Se hai domande oppure se vuoi lasciare la tua opinione su questo piatto lascia un commento cliccando here.

Photo taken with Canon EOS M100 and lens Canon EF-M 22.

Il cereale di base più usato in assoluto è il mais, importato in Europa dalle Americhe nel XVI secolo, che le dà il caratteristico colore giallo, mentre precedentemente era più scura perché la si faceva soprattutto con farro o segale, e più tardivamente anche con il grano saraceno, importato dall’Asia.
Continue and learn more on Wikipedia

A good polenta with mushroom sauce – Une bonne polenta sauce aux champignons – Una buena polenta con salsa de champiñones – Uma boa polenta com molho de cogumelos – Eine gute Polenta mit Pilzsoße – Polenta ngon với sốt nấm – 一个好的玉米粥配蘑菇酱 – マッシュルームソースのおいしいポレンタ

I ravioli al ragù di casa mia

I ravioli al ragù di casa mia

I ravioli al ragù di casa mia.
A casa mia, almeno per Natale e Pasqua, non mancano mai i ravioli di verdura fatti a mano dalla mia mamma.
I ravioli fatti nella maniera della Liguria di Levante (cioè magri) con qualche erba selvatica, se la si trova, ed un pochino di ricotta.
Conditi, ovviamente, con il ragù di carne (che in casa mia è quasi fatto come il classico “tuccu” genovese).
Enjoy your meal!

Ti ho fatto venire l’acquolina in bocca? Aggiungi un comment or go to the bottom of the site to read what other visitors have written.

I ravioli al ragù di casa mia

I ravioli al ragù di casa mia

Photo taken with Canon EOS M100 and lens Canon EF-M 22.

The ravioli with meat sauce of my house, the best stuffed pasta there is – Les raviolis sauce à la viande de chez moi, les meilleures pâtes farcies qui soient – Los raviolis con salsa de carne de mi casa, la mejor pasta rellena que hay – O ravioli com molho de carne da minha casa, a melhor massa recheada que existe – Die Ravioli mit Fleischsauce meines Hauses, die beste gefüllte Pasta, die es gibt – Mì ravioli sốt thịt của nhà mình, mì nhồi ngon nhất ở đó – 我家的肉酱馄饨,最好吃的酿意面 – 私の家のミートソースのラビオリ、そこにある最高のぬいぐるみパスタ

Tagliatelle bianche e verdi al ragù di carne

Tagliatelle bianche e verdi al ragù di carne

Tagliatelle bianche e verdi al ragù di carne.
Quando a casa mia si preparano i ravioli, quelli che fa mia mamma di solito per Natale, con la pasta che avanza si preparano le tagliatelle.
Come potete vedere la pasta è un po’ bianca ed un po’ verde perché colorata dal ripieno dei ravioli.
Tagliatelle condite poi con l’altrettanto buono ragù di carne, sempre quello cucinato da mia mamma, arriviamo quasi all’apice del piacere!

Ti piace la cucina italiana? Qual è il tuo piatto preferito? Lascia un commento cliccando here.

Photo taken with Canon EOS M100 and lens Canon EF-M 22.

White and green tagliatelle with homemade meat sauce – Tagliatelles blanches et vertes sauce à la viande maison – Tagliatelle blanco y verde con salsa casera de carne – Tagliatelle branco e verde com molho de carne caseiro – Weiße und grüne Tagliatelle mit hausgemachter Fleischsauce – Tagliatelle trắng và xanh với nước sốt thịt tự làm – 白色和绿色意大利面配自制肉酱 – 白と緑のタリアテルと自家製ミートソース

Polpo alla galiziana preparato a casa

Polpo alla galiziana preparato a casa

Polpo alla galiziana preparato a casa.
Non saprei dire se il polpo lo preferisco preparato alla genovese oppure alla galiziana.
In queste foto era alla spagnola per cui con paprika (mentre quello alla ligure non ha questa spezia ma limone ed olive).
Uno dei miei piatti preferiti senza dubbio.
Ho già descritto in un altro bel post la recipe!

Ti piace il polpo? Aggiungi un comment or go to the bottom of the site to read what other visitors have written.

Photo taken with Canon EOS M100 and lens Canon EF-M 22.

Octopus is a very popular mollusc in professional and sport fishing. Fishing techniques are traditional and consist of using a bait called pulcina, which is sometimes used together with crabs and fish. Sometimes fresh octopus is prepared using the curling technique directly on the rocks or in special machines that allow it to be tasted raw. The curled octopus has tentacles in the shape of “curls”, dilated suckers and a characteristic “crunchy” consistency.
Continue and learn more on Wikipedia

Galician-style octopus, with oil, salt and paprika, prepared at home – Poulpe à la galicienne, avec huile, sel et paprika, préparé maison – Pulpo a la gallega, con aceite, sal y pimentón, preparado en casa – Polvo à Galega, com azeite, sal e paprica, preparado em casa – Oktopus nach galicischer Art, mit Öl, Salz und Paprika, zu Hause zubereitet – Bạch tuộc kiểu Galicia, với dầu, muối và ớt bột, chế biến tại nhà – 加利西亚式章鱼,加油、盐和辣椒粉,在家准备 – ガリシア風タコ、油、塩、パプリカを自宅で調理

Il pollo in umido con le olive

Il pollo in umido con le olive

Il pollo in umido con le olive.
Uno dei miei piatti preferiti quando sono a casa è il pollo con le olive, così almeno lo chiamiamo noi in famiglia.
Petto di pollo tagliato a pezzetti cotto i olio d’oliva ed un goccio di concentrato di pomodoro, pinoli ed olive.
Molto gustoso!

Hai mai assaggiato il pollo cucinato in questa maniera? Aggiungi un comment or go to the bottom of the site to read what other visitors have written.

Il pollo in umido con le olive

Photo taken with Canon EOS M100 and lens Canon EF-M 22.

Stewed chicken with olives and pine nuts – Poulet mijoté aux olives et pignons de pin – Pollo guisado con aceitunas y piñones – Frango estufado com azeitonas e pinhões – Geschmortes Hähnchen mit Oliven und Pinienkernen – Gà hầm ô liu và hạt thông – 橄榄松子炖鸡 – 鶏肉のオリーブと松の実の煮込み