Fried rice or fried rice, the recipe. Fried rice is a versatile and tasty Asian dish, loved all over the world for its simplicity and richness of flavor. Perfect for using up leftover rice, this dish can be customized with a variety of fresh and colorful ingredients. Here's how to make authentic Asian fried rice at home. Obviously the recipe is much better if you use Asian rice (in my house we use Jasmine rice).
Ingredients:
– 300g cooked white rice (preferably day-old); – 2 eggs; – 200g peeled shrimp (optional); – 1 carrot, diced; – 1 red pepper, diced; – 100g peas; – 2 spring onions, sliced; – 2 cloves garlic, minced; – 3 tablespoons soy sauce; – 2 tablespoons sesame oil; – 1 tablespoon vegetable oil; – Salt and pepper to taste; – Fresh coriander for garnish (optional);
Preparation:
Make sure all your ingredients are ready and on hand. This will make cooking quicker and easier. In a large skillet or wok, heat 1 tablespoon of vegetable oil over medium-high heat. Crack the eggs into the skillet and give them a quick stir to scramble them. Once cooked, remove them from the skillet and set aside. In the same skillet, add another tablespoon of vegetable oil and cook the shrimp until they turn pink and opaque. Remove them from the skillet and set aside with the eggs. Add the sesame oil to the skillet and sauté the garlic for about 30 seconds. Add the carrots, bell pepper, and peas, and cook for 3-4 minutes until the vegetables are tender but still crunchy. Add the cooked rice to the skillet and stir well to combine with the vegetables. Make sure the rice separates well and does not stick together. Pour the soy sauce over the rice and stir well to distribute the flavor evenly. Add the scrambled eggs and cooked shrimp, and stir again. Add the sliced spring onions and season with salt and pepper to taste. Cook for another 2-3 minutes, stirring constantly. Transfer the fried rice to a serving plate and garnish with fresh cilantro, if desired. Serve hot and enjoy this delicious dish!
Fried rice is a dish that brings with it the authentic flavors of the East, easy to prepare and perfect for any occasion. With this recipe, you can surprise your guests or simply enjoy a tasty and nutritious meal at home.
Do you like this dish? Add your own comment or go to the bottom of the site to read what other visitors have written.
Fried rice, the recipe – Riz sauté ou riz sauté, la recette – Arroz frito o arroz frito, la receta – Arroz frito ou arroz frito, a receita – Gebratener Reis oder gebratener Reis, das Rezept – Cơm chiên hay cơm chiên, công thức
The text of the post was written with the help of Copilot, a virtual assistant based on artificial intelligence. References: – –
Saffron risotto or Milanese risotto, the recipe. Every now and then I love to enjoy a plate of saffron risotto and some time ago, the Chef on board, satisfied me with this dish! Saffron risotto, also known as Milanese risotto, is one of the symbolic dishes of Lombard cuisine and the city of Milan. This delicacy, characterized by its intense yellow color and rich and creamy flavor, is perfect for delighting the palate on special occasions or simply to pamper yourself with a traditional dish. Let's see together how to prepare it.
Ingredients (for 4 people):
– 320 g of Carnaroli or Arborio rice; – 1 l of meat broth (preferably beef); – 1 small onion; – 1 sachet of saffron (about 0.15 g); – 50 g of butter; – 50 g of grated Parmigiano Reggiano; – 1 glass of dry white wine; – 2 tablespoons of extra virgin olive oil; – Salt to taste; – Black pepper to taste (optional).
Preparation
First, prepare the broth, if possible, homemade with beef, celery, carrot and onion. Alternatively, you can use ready-made meat broth or a stock cube dissolved in hot water. Then finely chop the onion. In a large, low saucepan, melt half the butter together with the extra virgin olive oil. Add the chopped onion and let it soften over low heat, stirring occasionally, until it becomes transparent. Add the rice to the saucepan with the onion and toast it for a couple of minutes, stirring constantly. This step is essential to seal the grain and keep it al dente during cooking. Add the white wine and let the alcohol evaporate, continuing to stir. Once the wine has evaporated, start adding the hot broth a ladle at a time, stirring frequently. Wait for the broth to be absorbed before adding the next ladle. After about 10 minutes of cooking, dissolve the saffron in a ladle of hot broth and add it to the risotto. Continue cooking, adding broth until the rice is al dente (about 18-20 minutes in total). When the risotto is cooked to perfection, remove it from the heat. Add the remaining butter and the grated Parmigiano Reggiano. Stir vigorously to blend the risotto, obtaining a creamy and smooth consistency. Taste and adjust the salt, if necessary. If desired, add a sprinkling of freshly ground black pepper. Let the risotto rest for a couple of minutes before serving. Divide it among the plates and, if you like, decorate with a few saffron pistils. Tips. Quality of ingredients: using high-quality ingredients, especially rice, broth and Parmigiano Reggiano, will make the difference in the final result. Consistency in cooking: continuously stirring the risotto during cooking helps to release the starch from the rice, giving the dish its characteristic creaminess. Variation: for an extra touch of flavour, you can add beef marrow to the onion during the sautéing phase, following the Milanese tradition. Saffron risotto is a dish that combines simplicity and refinement, capable of conquering even the most demanding palates. Enjoy your meal!
Do you like this dish? Add your own comment or go to the bottom of the site to read what other visitors have written.
Risotto alla Milanese (also called yellow rice and saffron risotto, ris sgiald or risot a la milanesa in the Lombard language) is, together with cotoletta alla Milanese and panettone, the most typical and well-known dish of Milan. It is a risotto whose main ingredients, in addition to those needed to prepare a white risotto, are saffron, from which its characteristic yellow color derives, and beef marrow. It can also be served as a side dish for ossobuco, another typical Milanese dish. Continue and learn more on Wikipedia
Saffron or Milanese risotto, the recipe – Risotto au safran ou milanais, la recette – Risotto al azafrán o milanesa, la receta – Risoto de açafrão ou milanês, a receita – Safran- oder Mailänder Risotto, das Rezept – Công thức nấu món risotto nghệ tây hoặc Milanese
The text of the post was written with the help of ChatGPT, a language model from OpenAI.
Scaloppine al vino bianco e panna, la ricetta. This is one of my favorite dishes that my mom makes. I think it's a Swiss dish because it's a variation of the more classic scaloppine al vino bianco. We serve it with parboiled rice (or basmati).
Ingredients:
– 4 slices of veal; – 1 glass of dry white wine; – 200 ml of cooking cream; – 1 small onion; – 2 tablespoons of olive oil; – 30 g of butter; – Flour to taste; – Salt and pepper to taste; – Parboiled rice; – Two glasses of meat broth.
Preparation:
First start by preparing the rice, since it takes about twenty minutes to be ready. In a small saucepan, brown some onion with a knob of butter; once the onion is lightly browned, add the rice and add the broth. Check every now and then if there is still liquid and, if necessary, add more broth. Preparation of the slices: lightly flour the veal slices and shake them to remove the excess flour. In a large pan, heat the olive oil and butter. Add the veal slices and cook them over medium-high heat for about 2-3 minutes per side, until golden. Remove the slices from the pan and set aside. In the same pan, add the finely chopped onion and fry until it becomes transparent. Pour in the white wine and let the alcohol evaporate for a few minutes. Add the cooking cream and mix well. Leave to cook on low heat for about 5 minutes, until the sauce thickens slightly. At this point, return the veal slices to the pan and leave them to cook in the sauce for another 2-3 minutes, turning them once, so that they are well flavoured. Season with salt and pepper to taste. Serve the scallops in white wine and cream hot, accompanied by rice.
Have you ever tasted this dish? Add your own comment or go to the bottom of the site to read what other visitors have written.
Scaloppine with white wine and cream, the recipe – Coquilles Saint-Jacques au vin blanc et crème, la recette – Vieiras al vino blanco y nata, la receta – Vieiras com vinho branco e natas, a receita – Jakobsmuscheln mit Weißwein und Sahne, das Rezept – Công thức làm sò điệp với rượu vang trắng và kem
The text of the post was written with the help of Copilot, a virtual assistant based on artificial intelligence.
Grilled octopus with fried rice, the recipe. I have tasted grilled octopus several times (in Spain, Greece and Italy) and I like it very much. Using all the experience and some advice online I found the perfect recipe for my tastes that I describe here. The dish is accompanied by fried rice prepared by my wife who I will ask to write the preparation.
Ingredients
– a nice octopus (fresh or frozen); – half an onion;
For the marinade: – oil; – lemon; – garlic; – chili pepper; – white wine; – soy sauce; – salt; – pepper; – sweet paprika.
Preparation
First you need to boil the octopus: in a nice pot full of water add half an onion (and some other flavors if you like) and boil for about half an hour for every half a kilogram of weight. Once the octopus is cooked (you can test its softness with a fork and possibly let it cook a little longer) remove it from the water and let it cool. When it is lukewarm we cut it into smaller pieces for the marinade, leaving the tentacles whole. Now, in a container (I recently bought some plastic bags with an airtight seal, very useful for marinades), add the ingredients for the marinade (all of them) and the chicken. I leave them to infuse for a couple of hours outside the fridge to let the flavors absorb well.
Now all you need is a nice grill (or if you're lucky, a barbecue), bring it to temperature and place the octopus on it for a few minutes just to make it crispy and little more.
We plate with fried rice (or any other side dish you like) and we are ready to enjoy a dish with excellent flavor!
Do you like this dish? Add a comment or go to the bottom of the site to read what other visitors have written.
It is considered one of the most intelligent invertebrates; for example, it has been demonstrated that the common octopus has the ability to learn if subjected to association learning tests and by observing others of its species, an ability that had only been demonstrated in some mammals. This last evidence is quite surprising, since, being the octopus a strongly solitary animal, such behavior, typical of animals with social relationships, would seem inexplicable. Continue and learn more on Wikipedia
Grilled octopus with fried rice, the recipe – Poulpe grillé au riz sauté, la recette – Pulpo a la plancha con arroz frito, la receta – Polvo Grelhado com Arroz Frito, a receita – Gegrillter Oktopus mit gebratenem Reis, das Rezept – Công thức bạch tuộc nướng với cơm chiên
A mixed meat platter from a Turkish restaurant in Barcelona. Over the years, I have discovered that I enjoy Turkish cuisine from time to time and when I can, I go to a small restaurant in Barcelona. If you are a meat lover and want an authentic dining experience, a mixed meat platter from a Turkish restaurant is a must-try. This dish is a celebration of Turkish cuisine, combining a variety of expertly grilled meats and seasoning them with aromatic spices. The mixed meat platter usually includes a selection of meats such as lamb, chicken, beef and sometimes Turkish sausages called “sucuk”. Each type of meat is marinated in a blend of spices that can include cumin, paprika, coriander and garlic, giving it a rich, deep flavour. The charcoal grilling adds a smoky touch that further enhances the flavours. This dish is often served with a variety of side dishes that complement the meat perfectly. Among these, pilaf rice, bulgur, grilled vegetables and fresh pita bread are the most common. Sauces such as garlic yogurt and spicy tomato sauce are a must, adding a dimension of freshness and spiciness. Eating a mixed meat platter in a Turkish restaurant is not just a meal, but a convivial experience. The presentation of the dish is often spectacular, with the meats arranged on a large tray in the center of the table, inviting all diners to share and enjoy together. This reflects the Turkish culture of hospitality and sharing. The mixed meat platter is a true journey into the flavors of Turkey, an experience that delights the senses and warms the heart. If you have not tried it yet, we invite you to visit our restaurant and let yourself be transported by the scents and flavors of this extraordinary culinary tradition.
Do you like Middle Eastern cuisine? Add your own comment or go to the bottom of the site to read what other visitors have written.
A mixed meat platter from a Turkish restaurant in Barcelona – Une assiette de viande mélangée d’un restaurant turc à Barcelone – Un plato de carne mixta de un restaurante turco de Barcelona – Um prato de carne mista de um restaurante turco em Barcelona – Ein Teller mit gemischtem Fleisch aus einem türkischen Restaurant in Barcelona – Một đĩa thịt trộn từ một nhà hàng Thổ Nhĩ Kỳ ở Barcelona
The text of the post was written with the help of Copilot, a virtual assistant based on artificial intelligence.
Risotto with prawns and cuttlefish, the recipe. Some time ago I had lunch with my family at the good restaurant Le Gardenie in Riva Trigoso and I enjoyed an excellent risotto with prawns and cuttlefish. From the photos I took that day I decided to write you the similar recipe to try to make it at home. I do not guarantee that the result will be at the same level as what I ate that day!
Here is the recipe for a delicious risotto with prawns and cuttlefish:
Ingredients
– 320 g Carnaroli or Arborio rice; – 200 g prawns (cleaned and shelled); – 200 g cuttlefish (cleaned and cut into strips); – 1 onion; – 2 cloves garlic; – 1 litre fish stock; – 1 glass dry white wine; – 4 tablespoons extra virgin olive oil; – 1 knob butter; – Chopped parsley to taste; – Salt and pepper to taste; – Grated lemon zest (optional).
Preparation
First, let's prepare the ingredients: we need to clean the prawns and cuttlefish, cutting the latter into strips and then finely chop the onion and garlic cloves. Then we need to make the soffritto: in a large pot, heat the extra virgin olive oil and add the chopped onion and garlic cloves. Fry over medium heat until the onion becomes transparent. At this point, add the cuttlefish to the pot and cook for a few minutes until they become tender and pour in the white wine and let it evaporate. Add the rice to the pot and toast it for a couple of minutes, stirring constantly. Now start adding the fish stock, a ladle at a time, stirring continuously and waiting for the stock to be absorbed before adding more. Continue like this for about 15-18 minutes, until the rice is al dente. About 5 minutes before the end of cooking the rice, add the prawns. Continue stirring and adding the broth until the risotto is cooked to perfection. Now we finish with the creaming: remove the risotto from the heat, add the knob of butter and mix well to cream the risotto. Season with salt and pepper.
Now you can plate the risotto, sprinkle with chopped parsley and, if desired, add a little grated lemon zest for a touch of freshness.
Enjoy your meal! Do you like this dish? Add a comment or go to the bottom of the site to read what other visitors have written.
Risotto with prawns and cuttlefish, the recipe – Riz aux crevettes et seiche, la recette – Arroz con gambas y sepia, la receta – Arroz com camarão e choco, a receita – Reis mit Garnelen und Tintenfisch, das Rezept – Cơm với tôm và mực, công thức
The text of the post was written with the help of ChatGPT, a language model from OpenAI.
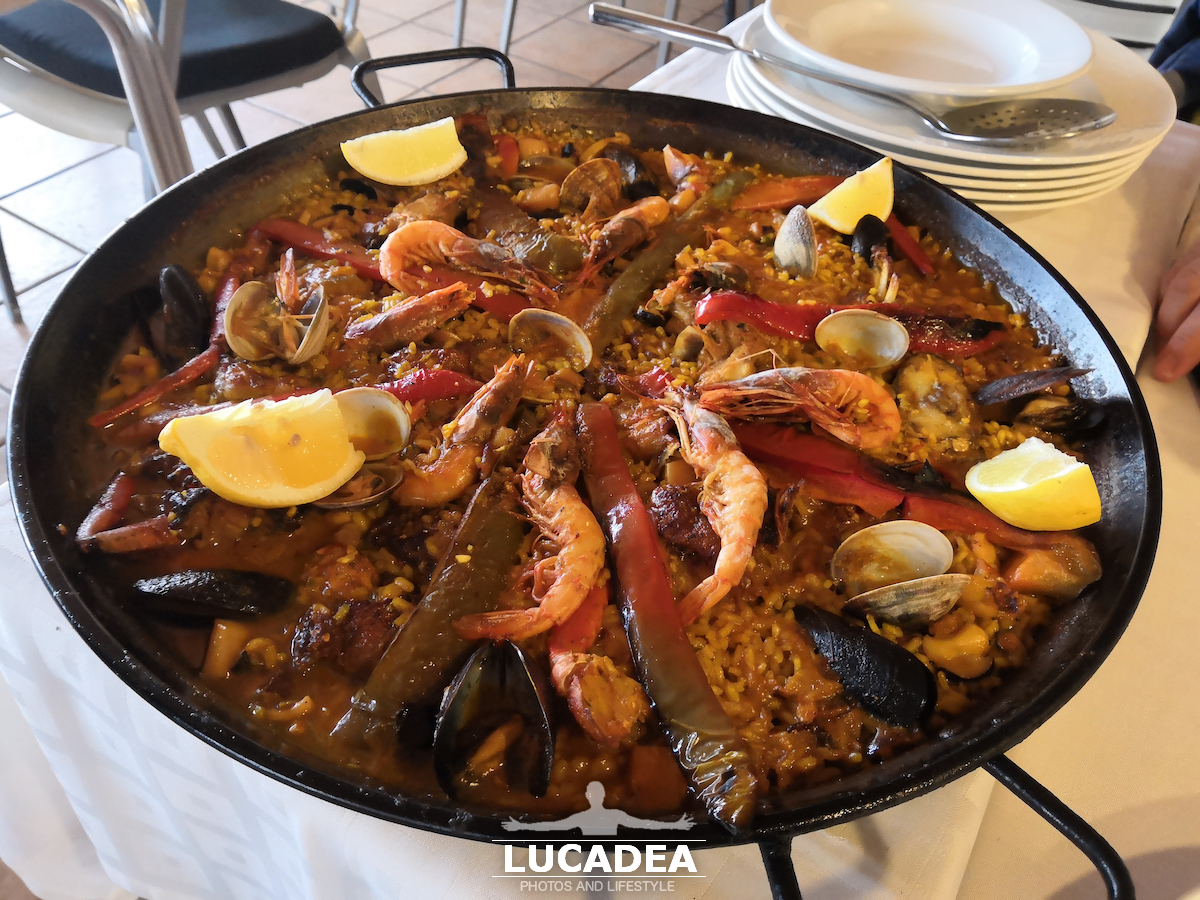
A hearty paella prepared on board. Every now and then, on board the Costa Crociere ships (depending on the itinerary), you can find this delight at the buffet. A huge paella served with a smile by our on-board chefs! This was prepared for the Costa Firenze Magnifico Buffet last year, when I was on board there.
Do you like paella? Add your own comment or go to the bottom of the site to read what other visitors have written.
Paella is a traditional Spanish dish made with rice, saffron, vegetables, meat and seafood. It originated in the Valencian Community and later spread throughout Spain, gaining popularity abroad, especially in the Mediterranean basin and Latin America. Etymologically, the Valencian word paella comes from the Latin patella, from which the French poêle, the medieval Spanish padilla and the Italian padella also derive. Continue and learn more on Wikipedia
A hearty paella prepared on board the ship – Une paella copieuse préparée à bord du navire – Una rica paella preparada a bordo del barco. – Uma farta paella preparada a bordo do navio – Eine herzhafte Paella, zubereitet an Bord des Schiffes – Món paella thịnh soạn được chuẩn bị trên tàu – 船上准备了丰盛的西班牙海鲜饭 – 船上で作るボリュームたっぷりのパエリア
Una buona paella spagnola gustata ad Ibiza. Diverso tempo fa ormai ho gustato questa ottima paella ad Ibiza, dove ero con la nave. La paella è un piatto iconico della cucina spagnola, originario della regione di Valencia, anche se è diventato popolare in tutta la Spagna e nel mondo. Questo piatto unisce sapientemente ingredienti come riso, carne, frutti di mare, verdure e spezie, creando un mix di sapori ricco e appagante. La paella deve il suo nome alla padella in cui viene tradizionalmente cucinata, una larga padella bassa chiamata “paellera”. Ecco alcune caratteristiche chiave della paella: Riso speciale: La paella tradizionale è preparata con un tipo di riso chiamato “riso paella” o “riso bomba”. Questo riso assorbe bene i liquidi senza diventare troppo appiccicoso o scuocere durante la cottura. Ingredienti vari: La versatilità della paella è una delle sue caratteristiche distintive. Le varianti includono paella di pollo, di pesce, mista (con carne e frutti di mare), e anche paella vegetariana. Gli ingredienti possono variare a seconda della regione e delle preferenze individuali. Zafferano e paprika: Questi sono due condimenti chiave che conferiscono alla paella il suo colore e sapore distintivi. Lo zafferano aggiunge un tocco di giallo al piatto, mentre la paprika dolce fornisce un sapore leggermente affumicato. Método di cottura: La paella è spesso cucinata all’aperto su un fornello a gas o su un fuoco aperto per garantire una cottura uniforme e il famoso “socarrat”, uno strato croccante di riso alla base della paellera. Condivisione e convivialità: La paella è spesso preparata in grandi quantità, rendendola ideale per condividere con amici e familiari. La presentazione diretta dalla paellera a tavola crea un’esperienza conviviale e festosa. La paella rappresenta non solo una prelibatezza gastronomica, ma anche un pezzo della cultura spagnola, con le sue radici nella tradizione contadina di Valencia. È un piatto che celebra l’amore per gli ingredienti freschi, la convivialità e la gioia di condividere un pasto delizioso con gli altri.
Do you like paella? Add a comment or go to the bottom of the site to read what other visitors have written.
A good Spanish paella enjoyed in Ibiza – Une bonne paella espagnole dégustée à Ibiza – Una buena paella española disfrutada en Ibiza – Uma boa paella espanhola saboreada em Ibiza – Eine gute spanische Paella auf Ibiza genießen – Món paella ngon của Tây Ban Nha được thưởng thức ở Ibiza – 在伊维萨享用美味的西班牙海鲜饭 – イビサ島で楽しむおいしいスペインのパエリア
The text of the post was written with the help of ChatGPT, a language model from OpenAI.
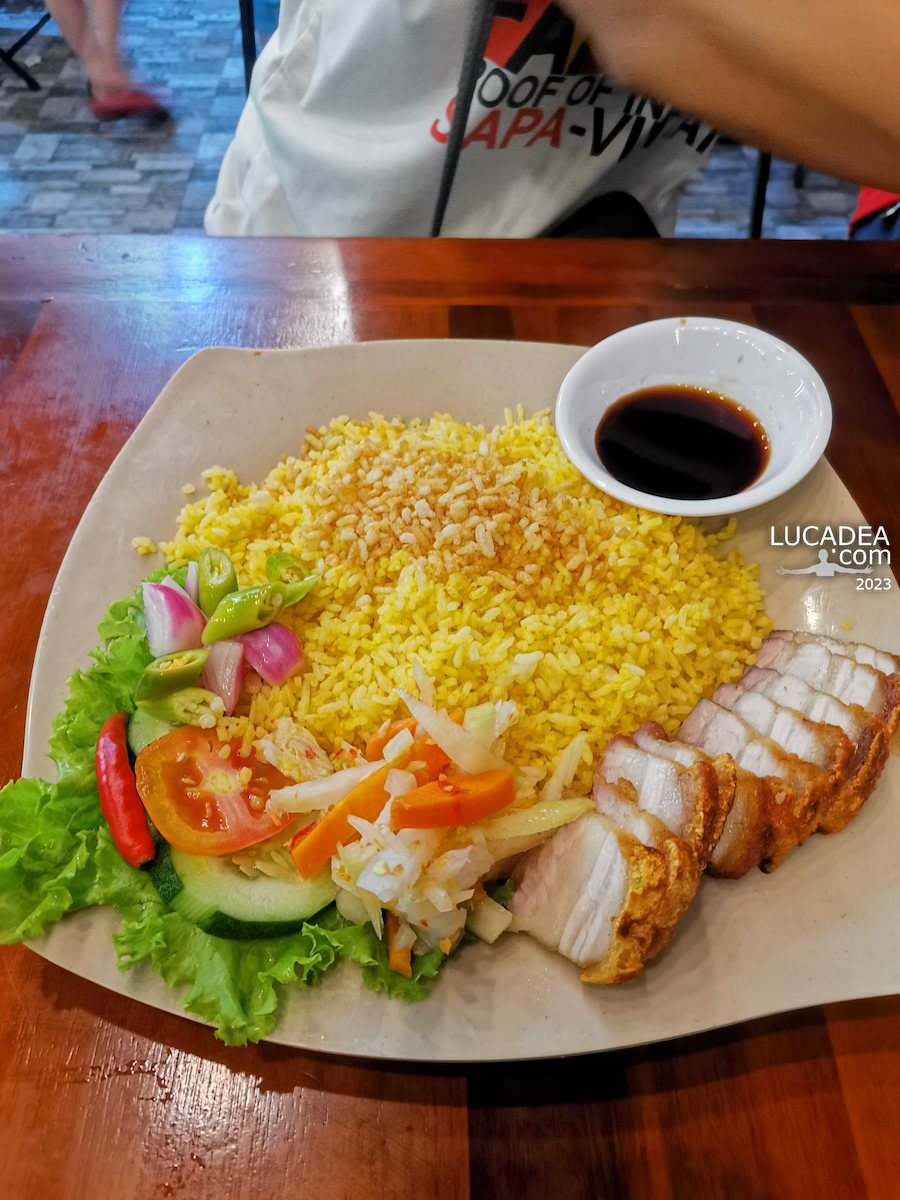
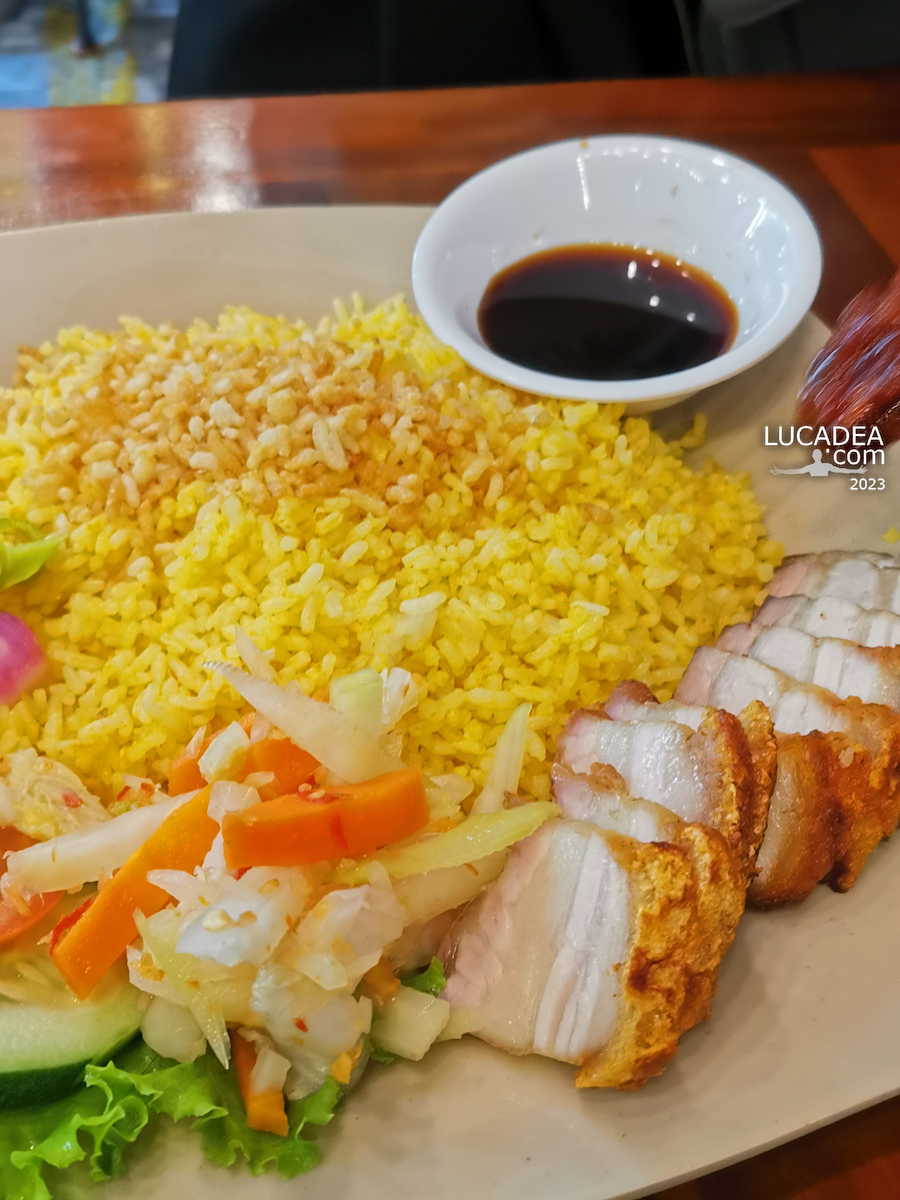
Vietnamese Cuisine: Fried Rice with Pork, the Recipe. As in the previous post, where I introduced A.Hai Chicken Rice (a long-standing and quite famous restaurant in Da Nang) I now introduce you to another delicious and interesting restaurant, located near my home area, which is Gia Vinh on Le Thanh Nghi Street, also in Da Nang. We stumbled upon this restaurant by chance: it was quite large and had attractive decoration, so we stopped. My husband ordered fried rice and seasoned shredded chicken, and I ordered fried rice with fried pork belly with crispy skin. It exceeded our expectations, the food here is delicious, the rice is soft and grainy, not greasy with oil, the fried rice includes crispy fried rice grains so when I eat it I feel very strange, delicious but not greasy. The pork belly is low in fat, the skin is very crispy and the seasoning is just right. The restaurant also offers many side dishes such as kimchi, pickled onions, garlic, chili sauce.
Click vào đây để đọc bằng tiếng việt! If you are curious about this recipe of mine or Vietnamese food in general, write me a message. comment or go to the bottom of the site to read what other visitors have written.
By the way: I would like to explain to you how to make fried pork belly with crispy skin.
Wash the pork belly and drain it. Put the water, 2 purple onions, 1 teaspoon of salt in a pot and bring to a boil. When the water boils add the meat and cook for 4 minutes. Then remove the meat, wash it, let it cool and drain it. Use a fork to make holes, evenly, on the surface of the skin (but not too deep into the fat). Marinate the meat with 1 teaspoon of monosodium glutamate, 1/2 teaspoon of sugar, 1/2 teaspoon of pepper, 1 teaspoon of spice powder. Take 3 purple onions and 2 garlics and crush them, squeeze the juice and use this water to marinate the meat. Warning: try to only coat the meat and not the skin. Now put it in the fridge for about an hour.
After 1 hour of marinating, place the meat in a baking tray (skin side up) and apply a thin layer of the mixture (1 teaspoon salt and 3 tablespoons lemon juice, all mixed well until the salt has dissolved).
Preheat the oven to 200 degrees Celsius for 10 minutes on high and low heat. Then put the meat in the oven and cook for 30 minutes. After 30 minutes of cooking, open the oven, add a thin layer of mixture on the skin and continue cooking for another 30 minutes. Next, adjust the heat mode to 150 degrees Celsius and the time 15 minutes. If the skin swells evenly, you can turn off the oven and take out the meat. The finished product should have a crispy and tasty skin. Then it is cut into small pieces and served with fried rice and a cup of soy sauce.
Như bài post trước tôi đã giới thiệu về cơm gà A.Hải- một quán ăn lâu đời và khá nổi tiếng tại Đà Nẵng. Nay tôi giới thiệu thêm 1 quán ăn khá là ngon và thú vị, nằm gần khu vực nhà tôi, đó là cơm gà Gia Vĩnh – đường Lê Thanh Nghị, Đà Nẵng. Ngẫu nhiên chúng tôi bắt gặp quán này, khá to và trang trí bắt mắt nên chúng tôi ghé vào. Chồng tôi gọi món cơm chiên và thịt gà xé tẩm gia vị, còn tôi gọi món cơm chiên ăn cùng thịt ba rọi chiên giòn da. Vượt ngoài mong đợi của chúng tôi, đồ ăn ở đây ngon, cơm mềm và tơi hạt, không bị ngán bởi dầu, trong cơm chiên có cho cả hạt cơm chiên giòn vào nên khi ăn tôi cảm thấy rất lạ, ngon nhưng không ngấy. Thịt ba rọi ít mỡ, da thì rất giòn, gia vị vừa ăn. Quán còn có rất nhiều đồ ăn kèm như: kim chi, hành tỏi muối chua, tương ớt…
Tiện đây tôi xin hướng dẫn cách làm: thịt ba rọi chiên giòn da
* 500g thịt ba rọi * hành tím * tỏi * 1 muỗng cà phê bột ngũ vị hương (nếu không có thì dùng đại hồi, tiểu hồi, đinh hương, quế: xay chung và sử dụng) * chanh * Gia vị: muối, hạt nêm, bột ngọt, tiêu, đường
Sơ Chế Nguyên Liệu
Thịt ba rọi rửa sạch, để ráo. Cho nước vào nồi và 2 củ hành tím, 1 muỗng cà phê muối, đun sôi. Khi nước sôi, tiếp tục cho thịt vào đun trong thời gian 4 phút. Sau đó vớt thịt ra, rửa sạch, để nguội, ráo. Dùng nĩa xăm đều trên bề mặt da, không xăm sâu xuống phần mỡ. Ướp thịt với 1 muỗng cà phê hạt nêm, 1 muỗng cà phê bột ngọt, 1/2 muỗng cà phê đường, ½ muỗng cà phê tiêu, 1 muỗng cà phê bột ngũ vị hương. Lấy 3 củ hành tím và 2 củ tỏi giã nhuyễn, vắt lấy nước, dùng nước này ướp đều lên phần thịt, cho toàn bộ phần thịt đang ướp vào ngăn mát tủ lạnh trong 1 giờ. (Ướp phần thịt, không ướp phần da, da để khô, lau sạch).
Nướng thịt:
Tiếp tục, pha hỗn hợp tạo độ giòn cho da: gồm 1 muỗng cà phê muối và 3 muỗng canh nước cốt của trái chanh, khuấy đều cho muối tan ra. Sau 1 giờ ướp thịt, bạn cho miếng thịt lên vỉ nướng (phần da hướng lên trên); quét 1 lớp mỏng hỗn hợp phía trên lên phần da.
Lò nướng: Làm nóng lò trước ở mức nhiệt 200 độ C trong thời gian 10 phút với lửa trên lửa dưới. Sau đó đặt vỉ thịt vào trong lò, để nhiệt độ 200 độ C, lửa trên lửa dưới và thời gian 30 phút. (Nhớ đặt thêm 1 khay hứng mỡ phía dưới, cho thêm ít nước vào khay cho thịt không bị khô). Sau khi nướng được 30 phút, mở lò, quét lên 1 lớp mỏng hỗn hợp tạo độ giòn và tiếp tục nướng thêm 30 phút. Tiếp theo, chỉnh lại chế độ lửa trên, nhiệt độ 200 độ C và thời gian 15 phút, trong khoảng thời gian này, bạn vừa nướng vừa quan sát, nếu phần da nổ đều thì có thể tắt lò và lấy thịt ra. Thành phẩm thịt có phần da giòn rụm, thịt thấm gia vị đậm đà. Sau đó bạn cắt từng miếng vừa ăn và ăn kèm với cơm chiên và 1 chén sốt nước tương.
Vietnamese cuisine: fried rice with pork, the recipe – Cuisine vietnamienne : riz frit au porc, la recette – Cocina vietnamita: arroz frito con cerdo, la receta – Cozinha vietnamita: arroz frito com carne de porco, a receita – Vietnamesische Küche: Gebratener Reis mit Schweinefleisch, das Rezept – Ẩm thực Việt Nam: cơm chiên thịt heo, công thức – 越南菜:猪肉炒饭,食谱 — ベトナム料理:豚肉入りチャーハンのレシピ
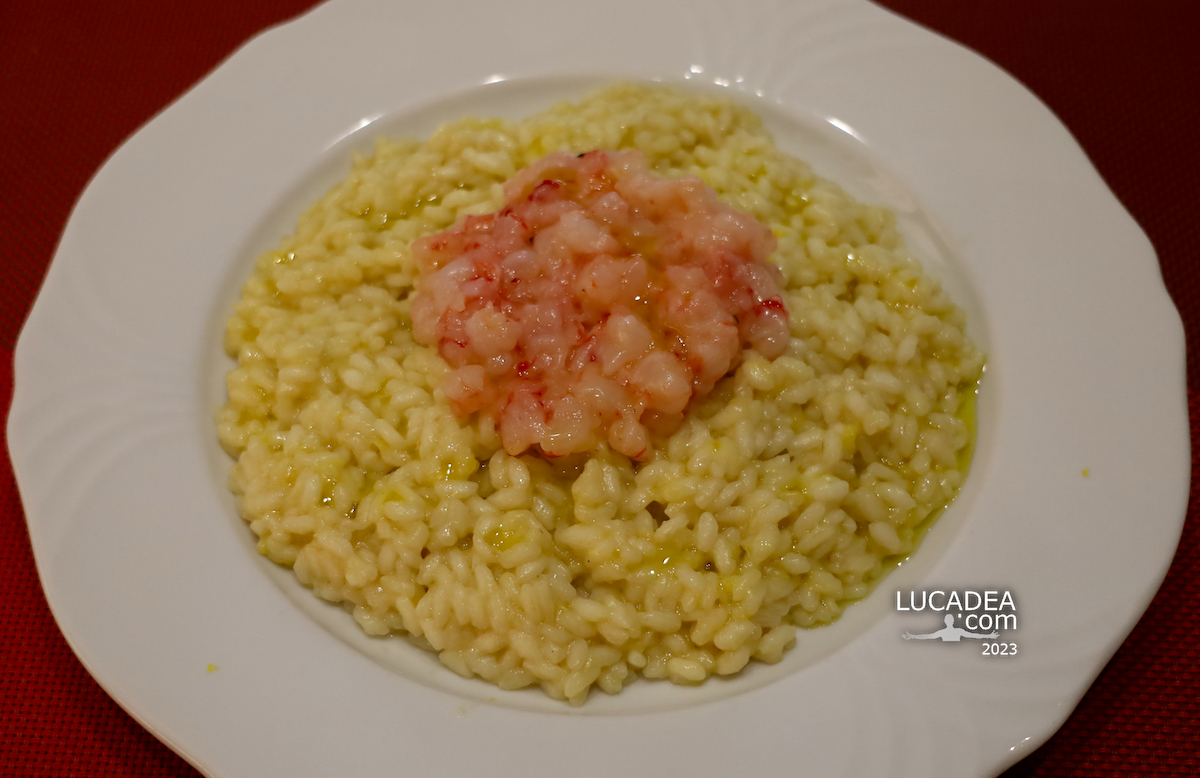
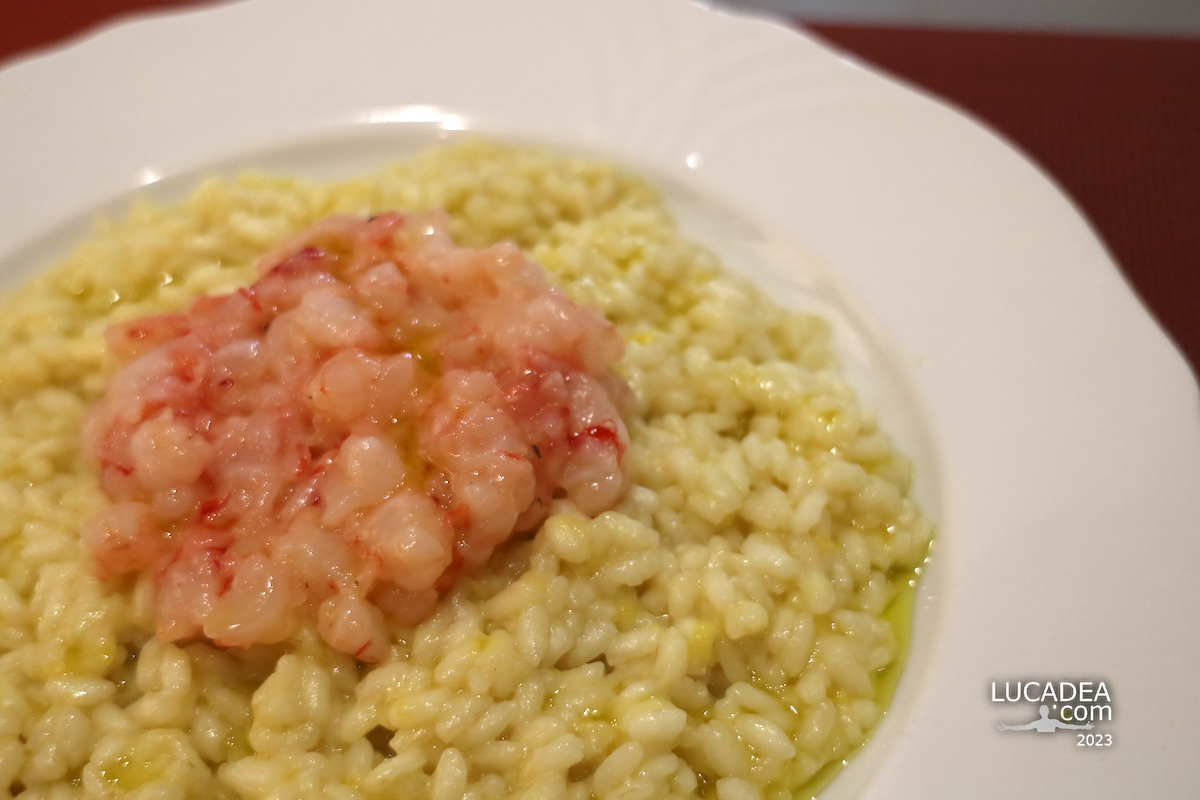
A nice risotto with raw prawns and lemon, the recipe.
I've been wanting to make a good risotto for a while now, so I tried this tasty recipe. The result was good, but I still have to work on it a bit!
Ingredients
– 320 g Arborio or Carnaroli rice; – 300 g raw prawns, cleaned and without heads and shells; – 1 shallot, finely chopped; – 2 tablespoons extra virgin olive oil; – 1 litre fish stock (or vegetable stock); – 1 glass dry white wine; – Juice and grated zest of 1 organic lemon; – 2 tablespoons butter; – Salt and freshly ground black pepper; – Chopped fresh parsley for garnish;
Preparation
Start by making the fish (or vegetable) stock. Bring the stock to a boil in a saucepan and then keep it warm over low heat. In a large skillet, heat the olive oil over medium heat. Add the chopped shallot and sauté for a few minutes until translucent. Add the rice to the pan with the shallot and toast for a couple of minutes, stirring constantly. Make sure each grain of rice is well coated in the oil. Pour the dry white wine over the rice and stir until the wine is completely absorbed. Start adding the fish (or vegetable) stock a ladle at a time, stirring constantly and waiting for the liquid to be absorbed before adding more stock. Continue this process for about 15-18 minutes or until the rice is creamy and al dente. In the meantime, dice the raw shrimp into small cubes and set aside. When the risotto is almost ready, add some of the raw shrimp cubes and stir well. The shrimp will start to change color and become opaque, which indicates that they are cooking. Remove the risotto from the heat and add the lemon juice and grated zest. Add the butter and stir until well combined. Season with salt and pepper to taste. Let the risotto rest covered for a minute, then serve hot, garnished with the remaining raw shrimp.
This risotto with raw shrimp and lemon is a real treat for the palate. The acidity of the lemon marries perfectly with the sweetness of the shrimp, creating a fresh and flavorful dish. Enjoy!
Do you like this dish? Do you have any suggestions for improving it? Add a comment or go to the bottom of the site to read what other visitors have written.
A nice risotto with raw prawns and lemon, the recipe – Un bon risotto aux crevettes crues et au citron, la recette – Un rico risotto con gambas crudas y limón, la receta – Um belo risoto com camarão cru e limão, a receita – Ein schönes Risotto mit rohen Garnelen und Zitrone, das RezeptCông thức món risotto ngon với tôm sống và chanh – 美味的烩饭,配生虾和柠檬,食谱 – 生エビとレモンの素敵なリゾット、レシピ
The text of the post was written with the help of ChatGPT, a language model from OpenAI.